

Facilities
Main page
Overview
The Hotel Facilities page is used to manage and categorize all facilities and amenities available at hotels in our system. Each facility can be configured to determine how it is displayed on the web and app, whether it is required, and additional attributes like type and maximum characters.
This page is accessible under the Hotel Management module and is essential for ensuring that hotel data is accurately presented to clients and internal teams.
Purpose
Centralize Facility Management: Maintain a single source of truth for hotel facilities.
Custom Display Options: Control which facilities are visible on the web, app, or both.
Data Consistency: Ensure all required fields are completed and formatted correctly.
Categorization: Organize facilities into categories such as
HotelFacilities,Pension,Distance, orRoomsfor easier filtering and reporting.
Where to use it
You typically work in two places:
Hotel → Facilities
Create facilities, categories, and templates.
Hotel → Hotels → Overview → Web
Assign facilities and fill values per hotel and per brand.
See Hotel Web.
Hotels must have a Facilities template selected on the hotel before you can set facilities in Web. See Hotel creation.
Tabs

There are four tabs:
Facilities: list of facilities. Create and maintain facility definitions.
Categories: Group facilities for display on web/offers/tickets.
Templates: Bundle facilities into reusable sets for hotels.
Name for Feeds: Optional naming used by external feeds/integrations.
Fields Overview
Name
The name of the facility.
Enter a clear, descriptive name for the facility. Example: “WiFi”, “Mini Market”, or “Outdoor Yoga”. Names should be concise yet descriptive.
Category
Defines the type or classification of the facility.
Select an appropriate category such as HotelFacilities, Pension, Rooms, or Distance. This helps organize and filter facilities.
Required
Specifies whether this facility must be completed when adding or updating a hotel.
✔ = required, ✖ = optional. Check the box if the facility is mandatory.
Filter on Web
Determines if the facility can be used as a filter option on the website.
✔ = users can filter hotels based on this facility. ✖ = cannot be used as a filter.
Show on Web
Controls whether the facility is displayed on the website.
✔ = facility visible to web users, ✖ = hidden. Useful for internal or optional facilities.
Show in App
Controls whether the facility is displayed in the mobile app.
✔ = visible in app, ✖ = hidden. Useful for facilities not relevant to app users.
Max Chars
Maximum number of characters allowed for this field (if applicable).
Enter a numeric limit for text fields, e.g., 150 characters for long descriptions. Leave blank if not applicable.
Type
Determines the type of data that can be entered for the facility.
Options include: • Text – free text • Multiline text – multiple lines • Message – short notification • Time – specific time • Activity – activity description • Date – calendar date • Yes/No – binary selection • Integer – numeric only
Flag on Web
Indicates if this facility should have a special flag or highlight on the website.
✔ = facility flagged on web (special attention). ✖ = no flag. Usually used for promotional or highlighted services.
Delete (trash icon)
Allows removal of the facility from the system.
Click the trash icon to delete the facility. This action is permanent and should be used carefully.
Example Workflow
Creating a New Facility
Click Create in the top-right corner.
Enter the Name and select the Category.
Configure whether it is Required, visible on Web/App, and if it should Filter or Flag on web.
Choose the Type based on the nature of the data.
Set Max Chars if needed.
Save the facility.
Editing an Existing Facility
Click the facility name.
Update any relevant fields.
Save changes to apply.
Deleting a Facility
Click the trash icon next to the facility.
Confirm deletion.
Facilities
Overview
The Facilities tab allows administrators to define and manage hotel facilities. These facilities can be displayed on the website, used for filtering, or highlighted in the booking process. Each facility can be customized with specific attributes, data types, and visibility settings.
Purpose
Define hotel facilities with detailed attributes.
Control how facilities are displayed and used on the website and booking interface.
Enable advanced filtering and visibility options for customers.
Support API differentiation for key facilities like All Inclusive, Swimming Pool, and Child Pool.
A new facility can be defined in the Facilities tab by pressing the "Create" button in the upper right corner of the screen.

There can be a maximum of 5 facility documents on a ticket.
If a ticket has more than 5 facilities with documents, only 5 documents are attached.
Deleting a facility removes it system-wide. If you only want to hide it, uncheck Show on Web, Show on Web as Filter, and Show in App instead.
Fields (Facilities tab)
Basic fields
Name
Short, guest-facing label (for example
Wi‑Fi,Swimming pool,Restaurant).
Category
Grouping used for display and sorting.
Categories are created on the Categories tab.
Data Type
Controls what can be entered on the hotel (text, number, yes/no, date, etc.).
Default Value
Optional prefilled value based on the data type.
Max Chars
Maximum length for text-like data types.
Ticket/offer documents
Document Title
The label shown for the attached document.
Document
Upload the document connected to the facility.
Keep files under 1 MB.
Mandatory and visibility
Is Mandatory
If checked, the facility must be filled when the hotel uses a facilities template.
Show on Hotels Popup
Shows in the hotel popup used in booking/offer flows.
Show on Web as Filter
Allows the website to filter hotels by this facility.
Show on Web
Displays on the website hotel details/listing.
Show in App
Displays in the Guest App hotel details.
Flag on Web
Visually highlights the facility on the website.
API flags (optional)
Use these only if your web/API integration expects them.
All Inclusive
Swimming Pool
Child Pool
Recommended workflow
Create categories (if you need new groupings).
Create facilities and assign them to categories.
Create a template that bundles the right facilities.
Select the template on the hotel (see Hotel creation).
Fill facility values on the hotel in Web (see Hotel Web).
Categories

Overview
Categories are used to group and organize facilities. Each facility must belong to a category. Categories can also be displayed in customer-facing contexts, such as tickets and offers, depending on their configuration.
Purpose
Provide structure and grouping for facilities.
Control visibility of category information on tickets and offers.
Simplify facility management and improve presentation on the web and booking flow.
Create a category

Navigate to the Category tab.
Click the Create button in the upper-right corner.
Fill in the required fields:
Name – The name of the category.
Show on Ticket – If checked, the category will be displayed on tickets.
Show on Select Offer – If checked, the category will be displayed on offers.
Save the category.
Fields
Name – Defines the category name (e.g., “Wellness,” “Dining,” “Family Amenities”).
Show on Ticket – Displays this category on the customer’s travel ticket.
Show on Select Offer – Displays this category in the booking offer.
Templates
Overview
Templates allow you to define predefined sets of facilities that can be applied to hotels. Using templates ensures consistency and saves time when assigning multiple facilities to different hotels.
Purpose
Standardize the configuration of hotel facilities.
Speed up the setup process by reusing predefined facility groups.
Reduce errors and manual input when managing multiple hotels.
Create a template
Navigate to the Templates tab.
Click the New Template button in the upper-right corner.
Fill in the required fields:
Name – The name of the template (e.g., “Family Hotel,” “Luxury Resort,” “All-Inclusive”).
Facilities – Select the facilities that should be included in this template.
Save the template.

Fields
Name – Defines the template’s name.
Facilities – A multi-select field to choose from existing facilities that will be bundled into the template.
Name for Feeds
Use this tab only if you send hotel content to external systems (feeds/partners).
It lets you maintain feed-specific labels without changing the guest-facing Name.
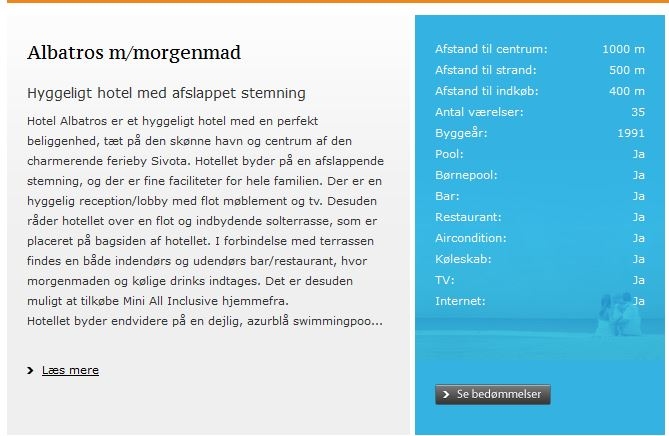
Facilities on web
On the website, facilities are displayed for the hotel like this:
FAQ
Why can’t I edit facilities on a hotel in Web?
The hotel needs a Facilities template first.
Select it on the hotel, then edit facilities in Hotel Web.
What’s the difference between Show on Web and Show on Web as Filter?
Show on Web controls whether the facility is displayed.
Show on Web as Filter controls whether guests can filter by it.
You can enable one without the other.
When should I use Is Mandatory?
Use it when a hotel template should enforce data completeness.
Example: you require a value for “Distance to beach” on beach hotels.
Should I delete facilities that are no longer used?
Usually no.
Delete is permanent and affects all hotels using the facility.
Instead, hide it by disabling Show on Web, Show on Web as Filter, and Show in App.
Last updated
Was this helpful?